As a paver contractor, showcasing DIY outdoor kitchen projects is key to attracting clients and showing expertise. High-quality images make your work shine. But what makes a photo stand out? It’s understanding photography and post-processing techniques for outdoor kitchen projects. Using the right approach, you can take your photos to the next level. This comes down to mastering the nuances of photography and post-processing techniques that are specifically tailored to outdoor kitchen projects.
Key Takeaways
- Use a high-quality camera with good low-light performance to capture the warm ambiance of an outdoor kitchen in the evening or on a cloudy day.
- Capture before and after shots to showcase the transformation of the outdoor space, highlighting the contrast between old and new.
- Focus on showcasing unique paver patterns, outdoor kitchen appliances, lighting and water features, countertops, and cabinets to highlight design and functionality.
- Edit photos to enhance natural colors and textures, adjusting exposure and contrast to make materials pop, while avoiding over-editing.
- Use a tripod, wide-angle lens, and additional equipment like reflectors to ensure sharp, high-quality images that showcase outdoor kitchen design and construction expertise.
Understanding DIY Outdoor Kitchen Projects
As the sun sets on a warm summer evening, the allure of a well-designed DIY outdoor kitchen project beckons, drawing family and friends together to savor the flavors of al fresco dining. A well-crafted DIY outdoor kitchen project seamlessly blends functionality and aesthetics, creating an inviting atmosphere that extends the indoor living space into the great outdoors. Typically, these projects feature a combination of functional elements such as grills, cooktops, and countertops, alongside decorative components like outdoor lighting, fire pits, and lush landscaping. The key to a successful DIY outdoor kitchen project lies in striking a balance between these elements, resulting in a harmonious and functional space that encourages socializing and relaxation. By incorporating personal touches and creative flourishes, homeowners can create a unique and welcoming outdoor oasis that reflects their personal style and complements their indoor living space. Ultimately, a well-designed DIY outdoor kitchen project has the power to transform the way we live, dine, and connect with others.
Essential Photography Equipment Needed
At least seven essential pieces of photography equipment are required to capture the beauty and functionality of a DIY outdoor kitchen project. Having the right gear can make all the difference in showcasing your outdoor kitchen design and construction expertise.
- Camera: A high-quality camera with good low-light performance is vital for capturing the warm ambiance of an outdoor kitchen in the evening or on a cloudy day.
- Tripod: A sturdy tripod guarantees that your camera remains stable, allowing you to take sharp images even in low-light conditions.
- Wide-angle lens: A wide-angle lens enables you to capture the entire outdoor kitchen space, including the surrounding landscape and architectural features, in a single shot.
Capturing Before and After Shots
When transforming an outdoor space into a stunning DIY outdoor kitchen, documentation is key. One of the most important aspects of capturing your DIY outdoor kitchen projects is taking before and after shots. These photos showcase the incredible transformation of the space, highlighting the contrast between the old and the new.
Shots should be taken prior to breaking ground, capturing the raw, unaltered state of the outdoor space. This could include overgrown vegetation, crumbling pavers, or outdated decor. These images will serve as a baseline, allowing you to demonstrate the extent of the transformation.
After shots, on the other hand, should be taken once the DIY outdoor kitchen project is complete. These photos should highlight the newly installed pavers, outdoor kitchen features, and any other design elements. The goal is to capture the finished product in its entirety, showcasing the beauty and functionality of the space.
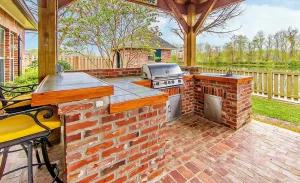
Showcasing Outdoor Kitchen Features
Zoom in on the details that make your DIY outdoor kitchen project shine by highlighting its standout features. This is where the magic happens, and your photography skills can truly showcase the beauty of your outdoor kitchen. By focusing on specific elements, you can create a visual narrative that tells the story of your DIY outdoor kitchen project.
Some of the key features to highlight include:
- Unique paver patterns: Capture the intricate designs and patterns created by the pavers, highlighting the texture and color variations that add depth and visual interest to the space.
- Outdoor kitchen appliances: Showcase the sleek lines and modern designs of outdoor kitchen appliances, such as grills, refrigerators, and sinks, which can become a focal point of the space.
- Lighting and water features: Highlight the ambiance created by outdoor lighting and water features, such as fire pits, waterfalls, or pool lights, which can add a sense of luxury and sophistication to the DIY outdoor kitchen project.
Editing for Professional Results
The raw image is just the starting point, a canvas waiting for the brushstrokes of editing to bring out the full beauty of your DIY outdoor kitchen project. Editing is where the magic happens, transforming a good shot into a stunning visual masterpiece that showcases your expertise as a paver contractor.
When editing your DIY outdoor kitchen projects, focus on enhancing the natural colors and textures of the materials used. Adjust the exposure and contrast to make the pavers, countertops, and surrounding landscape pop. Consider applying a subtle vignette to draw the viewer’s attention to the central feature of your outdoor kitchen.
Don’t overdo it, though – subtlety is key. You want to maintain the authenticity of the scene while still making it visually appealing. Remember, the goal is to showcase your craftsmanship and inspire potential clients to envision your work in their own backyard. By editing with precision and restraint, you’ll be able to create a portfolio that truly reflects the beauty and functionality of your DIY outdoor kitchen projects.
Frequently Asked Questions
What Time of Day Is Best for Capturing Outdoor Kitchen Project Photos?
For capturing stunning DIY outdoor kitchen projects, the golden hour, just before sunset, is ideal. Soft, warm light enhances textures, and long shadows add depth, creating visually appealing images that make your projects shine.
How Do I Handle Harsh Shadows in Outdoor Kitchen Photography?
When capturing DIY outdoor kitchen projects, harsh shadows can be mitigated by using reflectors, and diffusers, adjusting camera angles to soften contrast, or incorporating shadows as a design element to add depth and visual interest to the image.
Can I Use a Smartphone to Take High-Quality DIY Project Photos?
Yes, you can use a smartphone to take high-quality DIY project photos. With advanced camera technology and editing apps, smartphones can produce professional-looking images. Pay attention to lighting, composition, and focus to capture stunning visuals that showcase your DIY outdoor kitchen projects.
What Is the Ideal Weather for Capturing Outdoor Kitchen Project Photos?
For capturing stunning DIY outdoor kitchen project photos, ideal weather conditions involve soft, diffused natural light with minimal shadows, often found during early morning or late afternoon on overcast or partially cloudy days, accentuating the project’s textures and colors.
How Do I Photograph Outdoor Kitchen Projects With Awkward Angles?
When encountering awkward angles in DIY outdoor kitchen projects, utilize creative composition techniques, such as shooting from low or high vantage points, or experimenting with Dutch angles to add visual interest and dynamic flair to your photographs.
Conclusion
Capturing DIY outdoor kitchen projects requires attention to detail and a keen eye for visual storytelling. By utilizing high-quality photography equipment, capturing before and after shots, and highlighting unique features, paver contractors can showcase their expertise and inspire potential clients. Effective editing techniques enhance the visual narrative, maintaining authenticity while accentuating natural colors and textures. Ultimately, visually stunning representations of DIY outdoor kitchen revelation can elevate a contractor’s portfolio and attract new clients.
You May Also Like To Read: